Airbrushing fine lines [Free Airbrush Lesson 3]

Airbrushing fine lines [Free Airbrush Lesson 3]
Airbrushing fine lines is probably one of the main challenge for beginner airbrush artists.
I am sure you agree with me when I say :
Airbrushing fine lines is really hard.Paint splattering, discontinued lines, lines that looks like electrocardiogram rather than straight lines…you name it! It can be a nightmare for a beginner.”
Or is it?
In this article I am going to give you some quick tips that you can use to improve your ability to airbrush fine lines and see results immediately. And the end of this post there will be an exercise (and an exercise sheet to download) which I suggest you do over and over again to improve your technique at airbrushing fine lines, because after all, nothing will replace practice!
If you wonder what is the best airbrush to do fine lines, I can tell you that you don’t necessary need to buy an airbrush like the Custom Micron or any Airbrush with a 0.23 or 0.18 mm needle\nozzle combination to do it. Don’t get me wrong, it is certainly easier to spray a fine lines with the thinner needle, but there is other factor to consider. In my opinion, what does really matter when trying to achieve fine lines is practice, practice and …practice! It is only by practicing that you will become more proficient airbrushing fine lines.
- How to Hold Your Airbrush [Airbrush Lesson 1]
- How to airbrush Dots [Airbrush Lesson 2]
How to get fine lines with airbrush?
As I previously said, the needle size is not the only factor that will determine your ability to airbrush fine lines.There are many different elements that you need to take into consideration if you want to be able to airbrush fine lines.
Experience & Skills
The more you practice the more you will build confidence and improve the control you have over the airbrush trigger. This is true for beginner airbrush artist but also for experienced artists. It is always recommended to warm up and practice few stokes before starting a new project. An experienced airbrush artist is able to airbrush fine lines with any airbrush really. Using a quality tool will just make the task a bit easier.
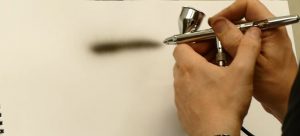
Distance from the artwork
To airbrush fine lines, the airbrush need to be very close to the surface you are painting. Sometimes you need to be just few mm from the surface.The farther away you are from you project, wider the line will be.
Airbrush Lesson: Broad spray from distance
Speed
The trick here is not to be hesitant. Keep moving, slowly, but never stop. Try experiment and see how the speed affect your lines.
Angle
It is best when to hold your airbrush perpendicularly to the surface.
Needle\nozzle size
Even though skills in my opinion has the biggest impact on your ability to airbrush fine lines, the use of a quality and suitable airbrush would help producing fine lines. Smaller nozzles size reduce over spray. This means that there is less “fuzzy” spray and therefore finer lines. But the nozzle size does not dictate the thinness of the line, it just makes it easier to accomplish.
Properly thinned paint
It is important to get the right paint texture and viscosity. Your paint should have the consistency of milk. For this exercise I would recommend you use paint that are ready-made for airbrushing like Iwata Comart airbrush paint, Createx paint, Dr ph martins airbrush paint or Golden airbrush colors. If using and airbrush with a very thin needle like the Iwata Custom Micron , you might need to thin the paint a bit to get a finer line.
Clogging
Clogging happens when a small quantity of paint dry at the needle tip. It will build up and eventually clog the airbrush. When you notice dry tip, just pinch the dry paint off the needle and keep going.You can remove the needle cap (end cap to protect the needle) of your airbrush to expose the needle so that you can remove the dry paint easily.It is also allow you to get nice and close and do fine details. Just be careful not to damage the needle or prick yourself with the tip.
Remember when using a dual action airbrush, keep pressing the trigger (releasing air) until you cut of the paint release by moving the trigger back to the starting point. This will prevent your airbrush from clogging by leaving paint inside the needle. If you have regular clogging issues and know that you are using the right technique, you can try using an airbrush thinner or a flow improver.
Needle condition
If your needle is bent for instance, this will prevent you to airbrush fine lines.
Air pressure
To achieve fine lines, you need to airbrush at a consistent low pressure. Try to set up your compressor at approx 20 PSI and see how it goes. If you are using an airbrush like the Iwata Custom Micron with a 0.23 mm needle, you would be able to drop the pressure and thin the paint a bit more than if using an airbrush like the Iwata HP-CS with a 0.35 mm needle. If you find that the paint is splattering, just increase the pressure a bit. With the experience you will be able to find the right balance.
Exercise: Airbrushing fine lines.
In this exercise you will learn how to airbrush fine lines. By doing this exercise, you will improve your triggers skills. You will learn when to pull the trigger to release the paint and when to close it.
Download the Airbrushing exercise sheet. There are two parallel lines on the exercise sheet. Try to airbrush lines in between those two lines.
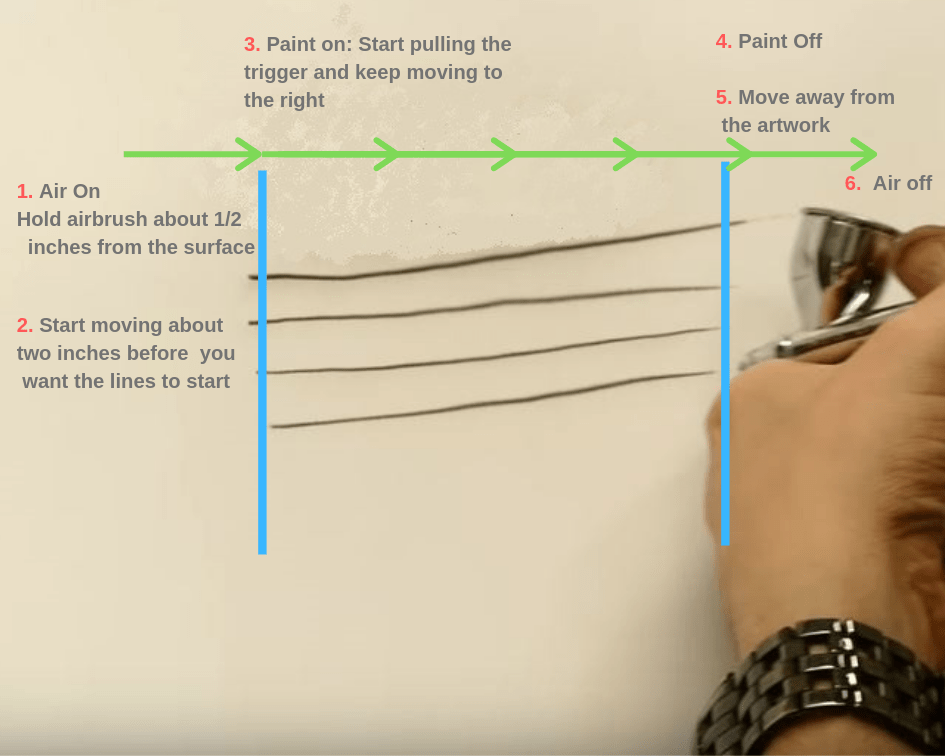
Proper sequence of action when using a dual action airbrush for fine lines:
1. Air on
Hold your airbrush about 1/2 inches from the surface. You can use your free hand as a guide or a spacer. Press the trigger down and keep it down up to sequence number 6
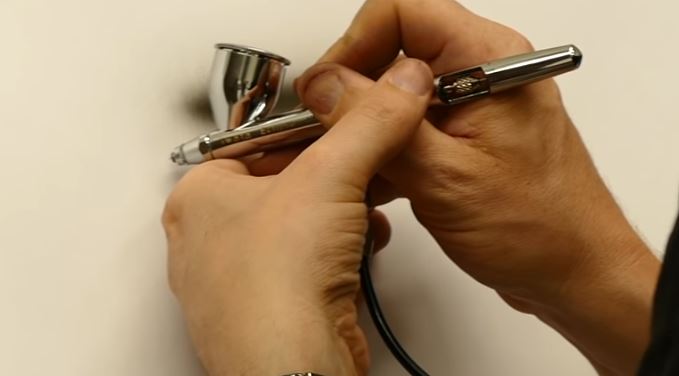
1. Air on: hold you airbrush 1/2 inches from the surface
2. Start moving
In order to be able to airbrush thin lines you will have start moving the airbrush before you start pulling the trigger for paint. Give yourselves a run up of about 2 inches and always keep moving the airbrush. By doing so you will avoid one of the most common mistake for a beginner:Dog bones.
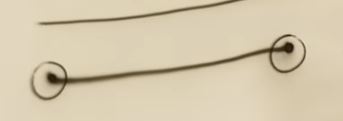
Airbrushing dog bones
Let me explain. You don’t want to wait for the paint to come out and move, then stop. keep moving all the time
3. Paint on
Once you go past the first vertical blue line, pull the trigger backwards to release the paint and keep moving your hand to the right.
4. paint off
Once you reach the second vertical blue line, push the trigger forward to stop the paint, still keep moving away from the artwork.
How to airbrush thin lines
5. move away
Move airbrush away from the artwork
6. air off
Now you can stop the air by moving the trigger up
Conclusion
In this lesson you have seen few tricks that hopefully will help you to master the thin lines. Keep practicing over and over and you will improve your muscle memory.
Keep experimenting with distances, pressures and speed. Notes the effects those variables have on your lines and try to find the limit of your airbrush. Try to draw a lines releasing more paint at the same speed. Now keep the same amount of paint and go faster…Experiment!
Drop me a comment and let me know how you are getting on!
![Airbrushing fine lines [Free Airbrush Lesson 3]](https://airbrushgeek.com/wp-content/uploads/thumbs_dir/how-to-airbrush-fine-lines-qkvlat4yt5faeivvdhv9zvm8mis2a1urye7yvynw3g.png)
![Airbrushing fine lines [Free Airbrush Lesson 3]](https://airbrushgeek.com/wp-content/uploads/thumbs_dir/Airbrush-equipment-list-qkvl4nb208zmaju3ctzbnflgfl5fthe4fw9dmnssvw.png)


