How to Clean an Airbrush: Cleaning an Airbrush Step By Step Guide

How to clean an Airbrush
Just as a soldier must learn to strip-down their rifle for cleaning, so must an airbrush artist learn to dismantle his or her airbrush for the same purpose and how to clean an airbrush properly.
Your airbrush will give you many years of trouble-free service if it is cared for, and the only way to clean it thoroughly is to disassemble it. That is not to say that you should strip your brush down each and every time you change the paint colour being used, but certainly at the end of a spraying session, when switching between materials or if you are experiencing problems such as paint drying within the brush, then a strip-down will almost certainly be necessary.
Check out my post about the Best airbrush for beginners
Flushing-through
Cleaning the airbrush when switching shades will not normally necessitate a complete strip-down, and simply flushing your brush through will prepare it for a colour-change. This process is straight forward, but precautions should be taken.
After decanting any unused paint from your airbrush, begin the cleaning process by blowing an appropriate cleaning agent, thinner, solvent or clean water – dependent upon the material or paint being used – through your airbrush to remove any surplus.
If your instrument has a top-mounted cup or an accessible internal paint chamber, then a clean, soft brush can be used for removing any residue from those areas whilst flushing-through.
Flush-through regularly as a normal part of your painting process and blockages should be few and far between. Any signs of paint beginning to dry within the airbrush: such as spluttering leading to interrupted paint-flow or paint spatter appearing on your work, should prompt a flush-through.
Using a Cleaning Pot to spray out paint


Solid End Caps.
If your airbrush is fitted with a solid end cap, then do not be tempted to smother it with a cloth or tissue when flushing-through. This may have been recommended to you by others and indeed other websites, but doing so will inevitably cause blow-back, especially on cheaper airbrushes that are not fitted with sufficient internal seals, which will cause waste material to build-up within the main body of the brush leading to yet more cleaning.
Instead, if you want to clean-out the end cap before removing it or as part of your painting routine, then hold a tissue or cloth a little way ahead of the end cap whilst flushing-through. This will allow sufficient cleaning agent to gather in the end cap to clean it without forcing waste material back into the body of the brush.
Crown & Slotted End Caps
Crown & slotted end caps allow the user to hold a cloth over the nozzle whilst flushing-out the paint chamber, thus cleaning the cap and needle tip in the process. Make certain, however, that you do not impede the air flow by blocking the end cap cut-outs entirely, as this too will cause blow-back.
The majority of cleaning solvent must be allowed to disperse and carry with it any unwanted material debris. This suggests another important precaution, and that is to make sure the waste exiting your brush is blown out of your work area via an extractor, or if the material you are using is water-based, that it is being captured in a suitable receptacle.
Cleaning Solvent
For cleaning, use the solvent with which you have been thinning your paint or an appropriate alternative: For example, if using enamel paints then enamel thinner or white spirit are recommended.
Water-based paints are best removed with clean water, though water alone will not shift dried-on paint. Sensibly therefore, you should never allow your brush to get into such a state that paint residue has dried hard either internally or around the needle tip.
Universal Airbrush Cleaners
As airbrushing has grown in popularity, so has the market become flooded with cleaning products that describe themselves as universal airbrush cleaners. Unfortunately, these products are rarely what they purport to be.
Many of them are water-based products which will not shift solvent based paint residue, and those that are solvent-based will struggle to shift water-based paints without creating a gloppy mess that blocks the airbrush completely.
In short, do not allow yourself to be influenced by advertising bluster. As a rule of thumb, you’re better off sticking to the simple principle that the solvent with which you have thinned your paint will also remove it from your airbrush.
Acetone
One solvent that could possibly claim to be a universal cleaning product is acetone. Acetone is a colourless, flammable liquid found in such products as nail-varnish remover, and it has many uses as a cleaner and de-greaser. Though it is not considered to be a hazardous air pollutant or a volatile organic substance, it is a chemical that dissolves resins, some plastics and super glue compound, and safety procedures should be followed when using it.
As it can be diluted with water, it can be used to clean most paint products and is especially effective on dried-on paint. However, acetone should not be considered a panacea, for as well as removing paint from your airbrush, in the long term it will also have a detrimental effect on your airbrushes internal rubber and plastic components – indeed, if your airbrush has a plastic body, I would think very carefully about using it at all. But to remove very stubborn dried paint from metal-bodied brushes, it has its uses if used sparingly.
Ammonia
Ammonia is widely used in the manufacture of household cleaning materials and can be effective in removing dried paint. When diluted in such products as window cleaning fluids, the ammonia concentrations are low, though undiluted liquid ammonia can cause burns and skin irritation, while exposure to high airborne concentrations can cause eye irritation and even respiratory problems, particularly in Asthma sufferers.
Affected airbrush parts should be left soaking in a diluted ammonia bath until any dried-on paint has begun to loosen.
Removing the end-cap, air-cap and nozzle.
The nozzle will routinely get blocked if paint is allowed to build-up during normal spraying, leading to unwanted spatter appearing on your work.
Periodic purging with thinner, solvent or water – depending on the material being sprayed – throughout your airbrushing session will help keep the nozzle clear, as will regularly removing the end cap and washing the needle-tip with a dampened, soft brush.
If blockages occur, then it might be necessary to remove just the end-cap, air-cap, needle and nozzle, to remove the build-up. If, however, the nozzle has been blocked with a build-up of semi-dry paint, then removing the nozzle and clearing the blockage will be necessary. This can be achieved by following steps 8 to 13 in the photographic sequence.
Stripping for action
Eventually though, either when finishing work for the day or when switching between materials, you will have to disassemble your airbrush and clean it thoroughly.
Airbrushes generally contain small, rounded parts, and it is a wise precaution to place all disassembled parts in a container or on a tray to prevent their loss.
Parts such as the end-cap, air-cap and nozzle can be placed in a bath of your chosen solvent to soak, whilst you clean out the cup or jars, body parts and needle. Despite external design differences, internally, most airbrushes are pretty similar mechanically – with the notable exception of Aztec brushes – though your brush may differ slightly from those illustrated here.
Follow the entire sequence of photographs when removing the needle and internal components for a thorough cleaning. Once you have stripped down your airbrush you can clean the individual components using tissues, a cloth or brushes dampened with your solvent or thinner of choice.
Re-assembly.
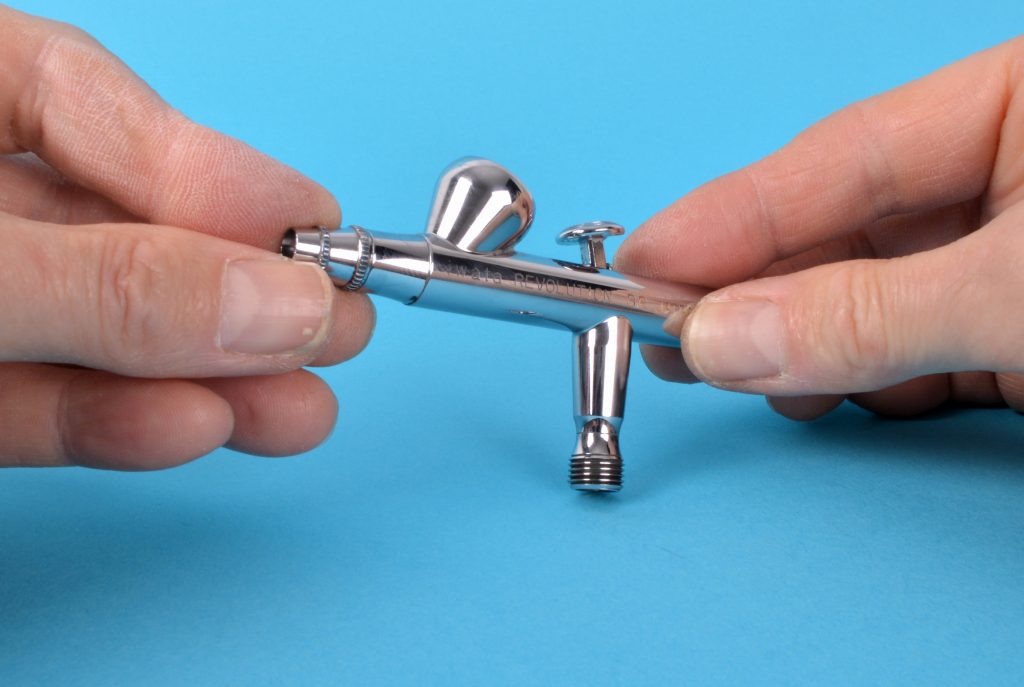
To re-assemble the airbrush, simply reverse the procedures, taking particular care not cross-thread or over-tighten the fragile nozzle.
When pushing the needle home through the rear of the airbrush, be certain that the lever (trigger) is in the correct position so to allow the needle to pass through it.
Neither should you force the needle home, gently push it until it stops of its own accord, butting up against the nozzle, before tightening the locking nut to secure it.
How to clean an Airbrush: Picture captions.
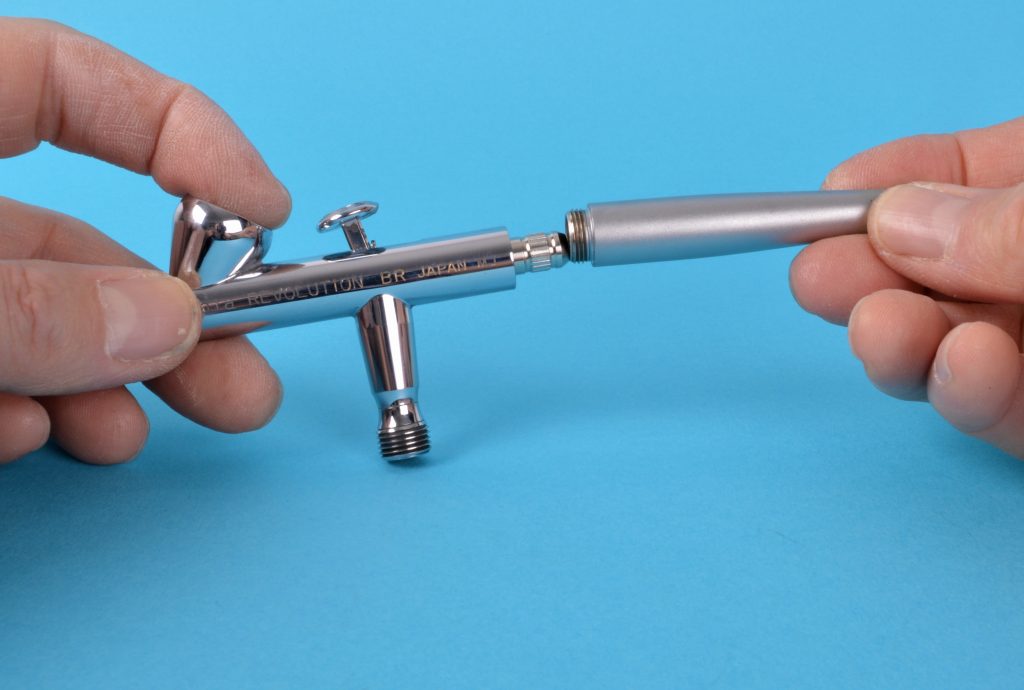
Cleaning an Airbrush Step 1:
Removing the handle allows access to the needle and needle locking nut.
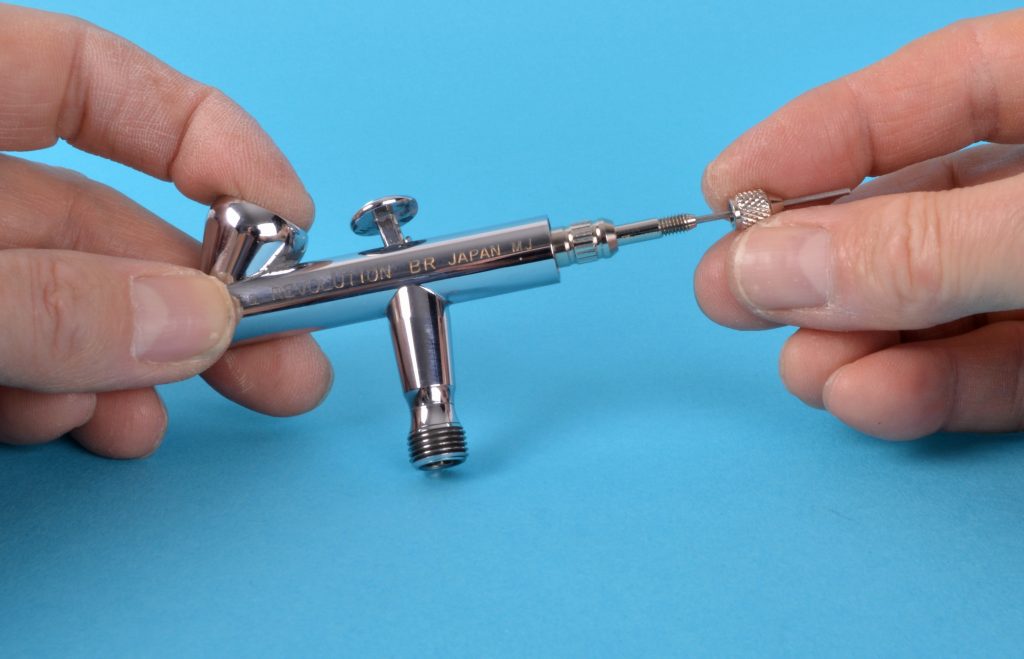
Cleaning an Airbrush Step 2:
Unscrew the needle locking nut and remove the needle. Alternatively, if the needle is likely to pull paint through the brush using this removal method, it can be removed from the front of the airbrush following steps 8 to 13.
Cleaning an Airbrush Step 3:
Unscrew the spring guide.

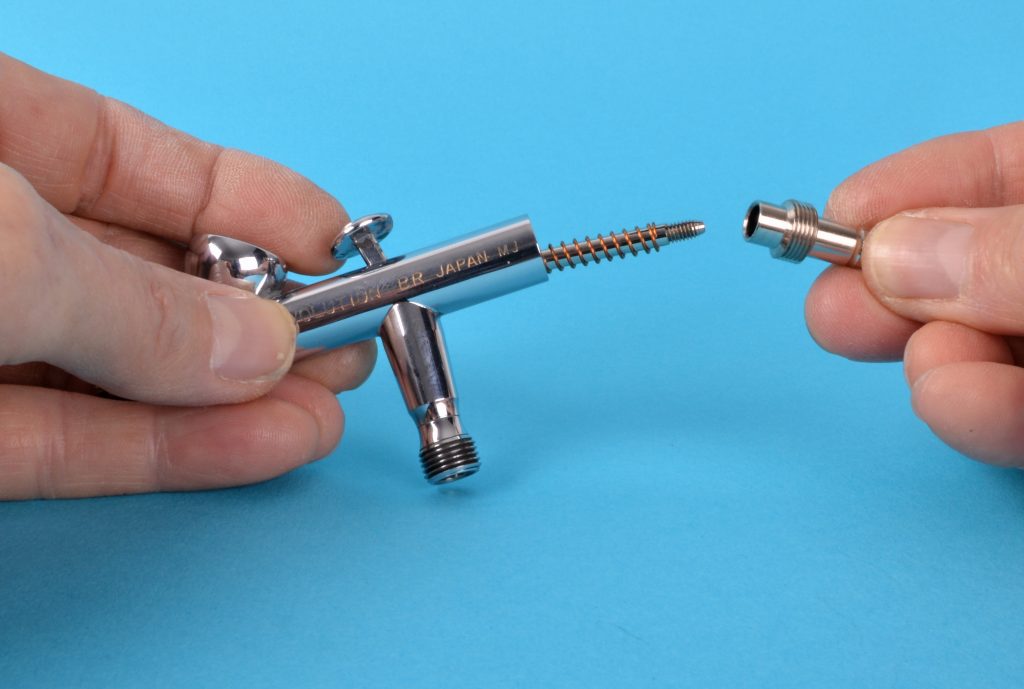
Cleaning an Airbrush Step 4:
Pull the spring guide back and away from the needle tube.
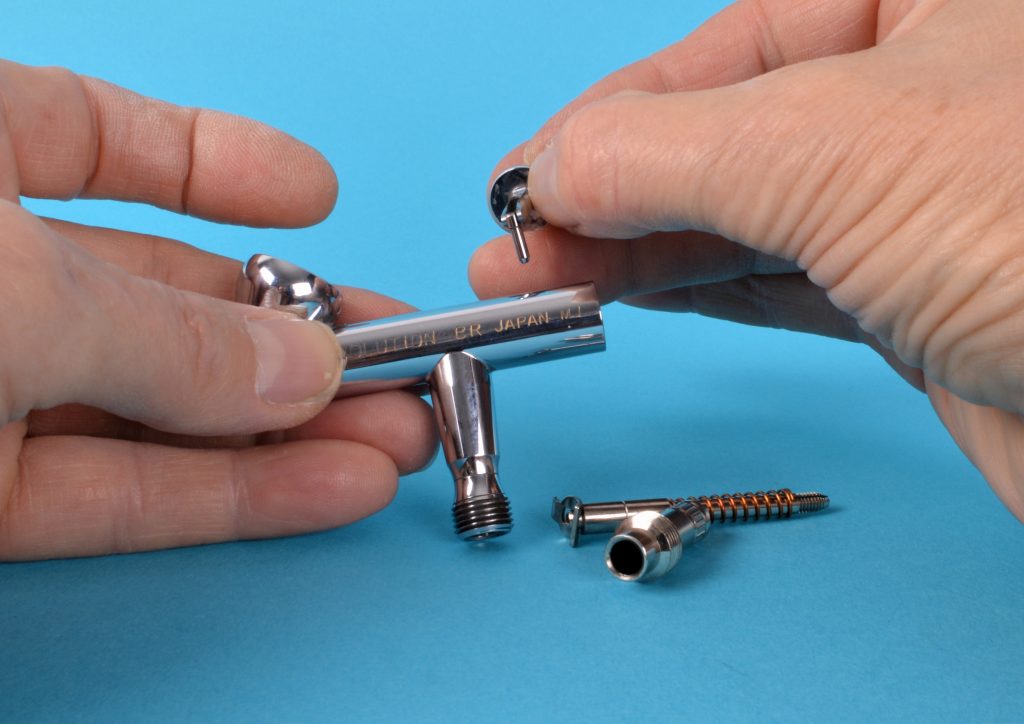
Cleaning an Airbrush Step 5:
Remove the needle tube and spring. This may also remove the rocker-arm, as many modern airbrushes have this item attached to the needle tube. If not, remove it along with the lever (step 6)

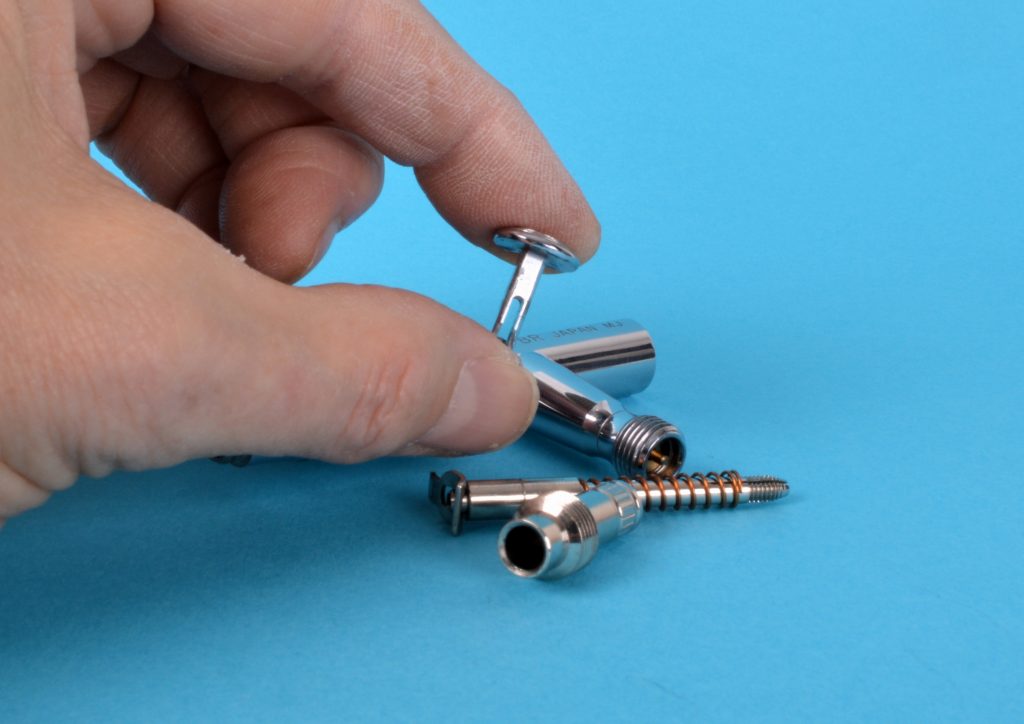
How to Clean an Airbrush Step 6:
The lever (sometimes called the trigger) can now be pulled from the top of the brush.
How to Clean an Airbrush Step 7:
The lever has a slot running through it, be sure when replacing it after cleaning that this runs front to back, so to allow the needle passage.
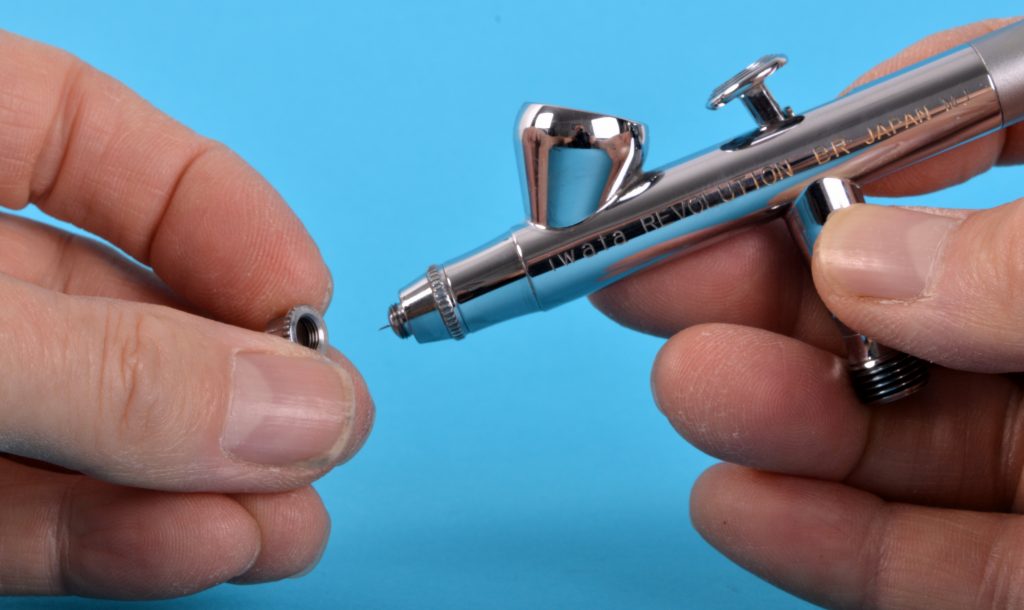
Cleaning an Airbrush Step 8:
Unscrew the end-cap counter-clockwise.
Cleaning an Airbrush Step 9:
Pull the end-cap carefully clear of the delicate needle tip to prevent damage.
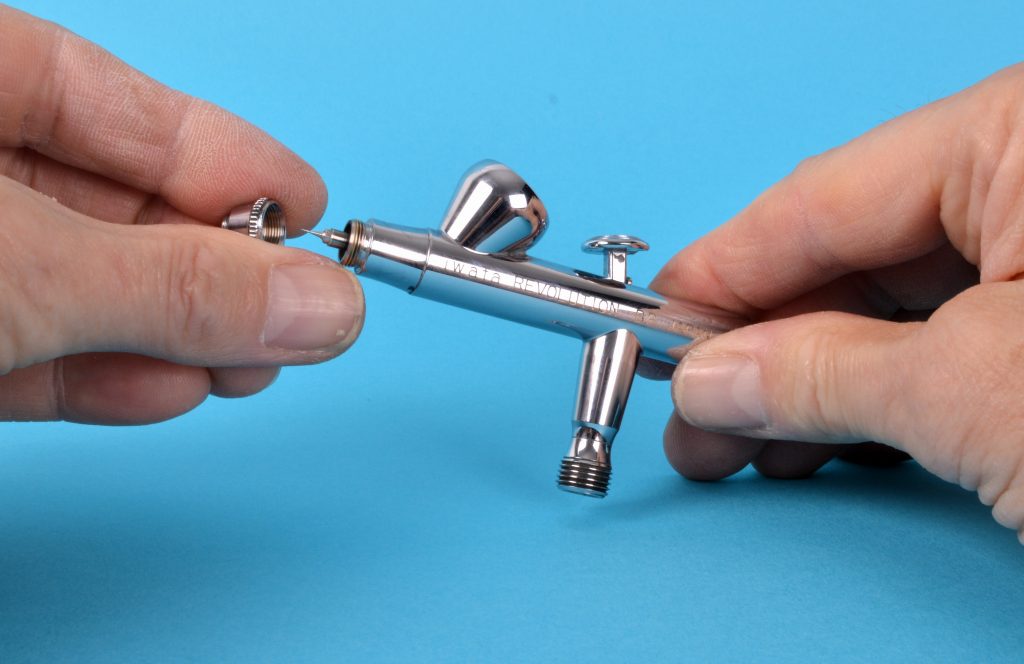
Cleaning an Airbrush Step 10:
Unscrew the air-cap, also counter-clockwise.

How to Clean an Airbrush Step 11:
Take similar precautions when removing the air-cap.
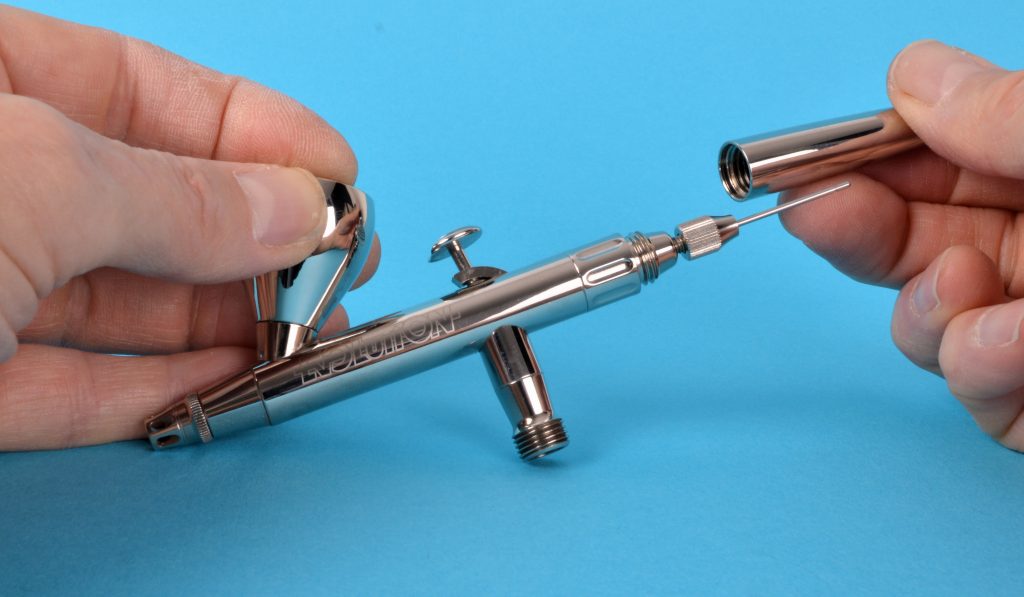
How to Clean an Airbrush Step 12:
Using the spanner supplied with the airbrush, gently unscrew the nozzle counter-clockwise.

Cleaning an Airbrush Step 13:
As an alternative to removing the needle from the rear of the brush, once un-clamped, it can be pulled from the front to avoid dragging paint debris back through the body of the airbrush.

Disassembling Harder & Steenbeck Airbrushes
German-based Harder & Steenbeck, produce some of the best airbrushes on the market today. They are built slightly differently from the majority in that they contain an additional central section that allows you to remove the internal components as a single unit if desired, minimising the chance of internal contamination. Neither do the nozzles require unscrewing in the normal fashion, thus negating any chance of thread damage during removal and reassembly. The following photographic sequence explains the disassembly process required.
Cleaning an Harder & Steenbeck Airbrush: Step 1
Remove the handle as normal.
How to clean an airbrush: Step 2
Unscrew the central section.

How to clean an airbrush: Step 3
Remove the internal components. (These can be further disassembled for cleaning as described above).

Cleaning an Harder & Steenbeck Airbrush: Step 4
Remove the lever and rocker-arm combination.

How to clean an airbrush: Step 5
The nozzle unit simply pulls away from the air-cap.

By Jay Blakemore: www.jaysmodelart.co.uk


