How to use airbrush food coloring to achieve vibrant colors?

In this step-by-step guide, I will explain how to use airbrush food coloring to achieve vibrant colors. The purpose of this guide is to provide you with the necessary information and techniques to create stunning and colorful designs on your baked goods or culinary creations. By following these simple steps, you will be able to achieve vibrant and eye-catching colors that will delight your customers or guests. Let’s get started!
Top-rated Airbrush Food Coloring Recipes


A Guide to Buying Airbrush Food Coloring for Beginner Cake Decorators
Gather the necessary materials
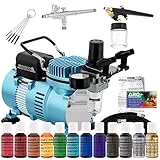
To get started with airbrushing, you will need to gather a few essential materials. First and foremost, you will need an airbrush machine, which is the main tool for creating amazing designs and patterns on various surfaces. Ensure that you have a reliable and well-functioning airbrush machine before proceeding.
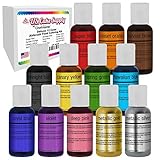
Next, gather some food coloring in different colors that will be used to create your desired designs. Make sure the food coloring is suitable for airbrushing, as not all types are compatible. You can find airbrush-specific food coloring at most arts and crafts stores or online.
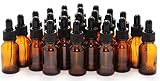
In addition to the food coloring, you will need dropper bottles for easy and precise application. These bottles allow you to control the amount of coloring you add to your airbrush, helping you achieve the desired intensity and shades. Have a few dropper bottles ready and make sure they are clean and in good condition.
Distilled water is another essential ingredient for airbrushing. It is important to use distilled water instead of tap water to avoid any impurities or minerals that may clog the airbrush. Keep a bottle of distilled water nearby to dilute and mix your food coloring as needed.
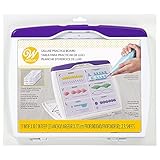
Lastly, have a clean mixing container on hand to blend your food coloring and water. This container can be a small bowl, cup, or any suitable vessel that allows you to stir and mix the ingredients thoroughly. Ensure that the mixing container is clean and free from any residue that could affect the quality of your airbrushing.
By collecting these necessary materials, including an airbrush machine, food coloring, dropper bottles, distilled water, and a clean mixing container, you will be ready to dive into the world of airbrushing and embark on your artistic journey.
Prepare the food coloring mixture
To prepare the food coloring mixture, follow these simple steps:
- Start by obtaining a clean mixing container. Ensure it is free from any residue or contaminants to maintain the purity of the color.
- Combine a small amount of food coloring with distilled water in the mixing container. The exact amount will depend on your specific needs, but a 1:1 ratio of food coloring to water is a good starting point.
- Mix the food coloring and water together thoroughly using a spoon or a stirring rod. Make sure the color is evenly distributed throughout the mixture.
- Assess the vibrancy of the color. If it is too dull or faint, gradually increase the amount of food coloring until the desired intensity is achieved. On the other hand, if the color is too strong, add a little more water to dilute it.
- Continue adjusting the ratio of food coloring to water until you have reached the desired vibrancy for your intended use.
- Remember to keep track of the proportions used in case you need to recreate the same color in the future.
By following these instructions and tweaking the ratio of food coloring to water, you will be able to prepare a customized mixture that accurately reflects the vibrancy you desire.
Mix the solution thoroughly
To mix the solution thoroughly, start by stirring the food coloring and water mixture. Use a spoon or whisk to ensure that the ingredients are well blended. Make sure to check for any clumps or streaks of color in the mixture. Continue stirring until the solution appears evenly colored and all ingredients are fully incorporated.
Example: Gently stir the red food coloring and water mixture in a clockwise direction. Continue stirring for about one minute, making sure to reach the edges of the container to prevent any concentration of color in one area. Watch for any clumps or streaks of red and use the spoon to break them apart or blend them in. Once you see a smooth, uniform red color throughout the solution, you can consider it thoroughly mixed and ready for use.
Example: Using a whisk, vigorously stir the blue food coloring and water mixture in a back-and-forth motion. Pay close attention to any areas that might have clumps of blue or streaks of concentrated color. Use the whisk to break up these clumps and blend in any streaks until the solution appears uniformly blue. Continue whisking for another minute to ensure the mixture is well incorporated.
Transfer the mixture to dropper bottles
Using a funnel, carefully pour the food coloring mixture into dropper bottles to make the airbrushing process easier. Here are the steps to follow:
- Gather the necessary materials: funnel, dropper bottles, and the prepared food coloring mixture.
- Place the funnel securely on top of one of the dropper bottles.
- Hold the funnel steady with one hand and slowly pour the colored mixture into the funnel.
- Make sure to pour the mixture directly into the dropper bottle and avoid any spills.
- Once the dropper bottle is filled, remove the funnel and securely close the bottle with its cap.
- Repeat the process for the remaining colors, using a clean funnel each time to prevent color mix-up.
- Shake each dropper bottle gently to ensure the mixture is well mixed and ready for use.
By transferring the mixture to dropper bottles using a funnel, you will have better control over the amount of color used during the airbrushing process. This will make it easier to achieve the desired effect and ensure a clean and precise application of colors.
Test the colors on a practice surface
When using an airbrush to apply food coloring to a surface, it’s important to test the colors on a practice surface beforehand. This step will help you make sure that the colors appear vibrant and the consistency is just right for your desired outcome. Here’s a guide on how to test the colors effectively:
- Prepare a practice surface: Find a piece of paper or a non-porous surface that closely resembles the texture and color of your final project. This will allow you to get a realistic preview of how the colors will look.
- Set up your airbrush: Make sure your airbrush is cleaned and properly assembled. Fill the paint cup or reservoir with the desired food coloring, ensuring it is well-mixed and not too thick or thin.
- Start with a mist coat: Holding the airbrush about 6-8 inches away from the practice surface, gently pull back the trigger to release a mist coat of the food coloring. This initial layer will give you a sense of the color saturation and coverage you can expect.
- Test different air pressure levels: Adjust the air pressure on your airbrush compressor to see how it affects the color application. Experiment with higher or lower pressures to find the best balance between a smooth application and vibrant colors.
- Check for consistency: Pay attention to how easily the food coloring sprays through the airbrush. If it appears too thick and clogs the nozzle, you may need to thin it down with a compatible food-grade thinner. On the other hand, if the coloring is too thin and runs off the surface, you’ll need to adjust the consistency by adding more coloring.
- Evaluate the color vibrancy: After allowing the mist coat to dry, inspect the colors on your practice surface. Are they vibrant and true to your expectations? If desired, you can build up additional layers to intensify the color or adjust the shade by mixing different food coloring hues.
By testing the colors on a practice surface, you can ensure that your final project will turn out exactly as you envision it. Take your time, experiment with different techniques, and don’t hesitate to make adjustments until you achieve the perfect result. Happy airbrushing!
Use the airbrush to apply the colors
Attach the airbrush machine to the air compressor. Adjust the pressure on the compressor to the desired level. Hold the airbrush approximately 6-8 inches away from the surface you wish to color. Start applying the food coloring by spraying in even strokes. Build up the color gradually as needed, making sure to cover the entire area evenly. Remember to maintain a consistent distance from the surface to achieve a smooth and even application. Experiment with different spraying techniques to achieve the desired effect.
Key takeaways for stunning colors
In conclusion, achieving vibrant colors with airbrush food coloring is possible with the right techniques. Proper mixing and testing are crucial to ensure the desired shade, while proper application techniques such as adjusting the air pressure and distance from the surface are key to achieving vibrant and consistent results. By following these steps, you can create stunning and vibrant food creations that are sure to impress.
Necessary Supplies